Data binding
About 2 min
Data binding
- A very important concept in an Angular application is
data binding Data bindingautomatically keeps your page (template) up-to-date based on your application's state- The application's state is maintained in the
component
- The application's state is maintained in the
Data bindingalso allows us to capture auser interactionand perform some logic then
Example
- The following
StackBlitzexample contains all the possibledata bindings:
Interpolation
- From
ComponenttoTemplate - Show the value of a
propertyin thecomponentclass by using thedouble curly bracketsnotation:
<p>{{ course }}</p>
export class AppComponent {
  course: string = "Angular";
  year: number = 2020;
  name: string = "Michaël";

  imageUrl: string =
    "https://images.pexels.com/photos/3945682/pexels-photo-3945682.jpeg?auto=compress&cs=tinysrgb&dpr=1&w=250";

  showAlert() {
    alert("This is an event binding!");
  }
}
Property binding
- From
ComponenttoTemplate - Pass the value of a
propertyfrom thecomponentto apropertyof the HTML element in thetemplate(DOM) by using the[ ]notation.
<p><img [src]="imageUrl" /></p>
export class AppComponent {
  course: string = "Angular";
  year: number = 2020;
  name: string = "Michaël";

  imageUrl: string =
    "https://images.pexels.com/photos/3945682/pexels-photo-3945682.jpeg?auto=compress&cs=tinysrgb&dpr=1&w=250";

  showAlert() {
    alert("This is an event binding!");
  }
}
HTML properties
- You can pass values to any available
propertyof the HTML element - Check a full list of properties on w3schools:
Interpolation <=> Property Binding
Interpolation is a method of Property Binding. Which to use depends on the situation and what you want to achieve.
Interpolation is ideal for displaying dynamic data directly in templates, using a simple syntax. On the other hand, property binding is more suited for binding component properties to HTML element properties, allowing for dynamic updates based on changes in the component.
Event binding
- From
TemplatetoComponent - Allows you to listen for and respond to user actions such as keystrokes, mouse movements, clicks, and touches by using the
( )notation.
<p><button (click)="showAlert()">Show alert</button></p>
showAlert()is afunction/methodin thecomponent
export class AppComponent {
  course: string = "Angular";
  year: number = 2020;
  name: string = "Michaël";

  imageUrl: string =
    "https://images.pexels.com/photos/3945682/pexels-photo-3945682.jpeg?auto=compress&cs=tinysrgb&dpr=1&w=250";

  showAlert() {
    alert("This is an event binding!");
  }
}
Two-way binding
- From
TemplatetoComponentAND fromComponenttoTemplate - Allows you to display a data
propertyand update thatpropertywhen the user makes changes by using the[(ngModel)]=notation (banana in a box).
<p><input [(ngModel)]="name" id="name"></td></p>
nameis thepropertythat will be updated
export class AppComponent {
  course: string = "Angular";
  year: number = 2020;
  name: string = "Michaël";

  imageUrl: string =
    "https://images.pexels.com/photos/3945682/pexels-photo-3945682.jpeg?auto=compress&cs=tinysrgb&dpr=1&w=250";

  showAlert() {
    alert("This is an event binding!");
  }
}
[(ngModel)]
- You have to import the
FormsModulein the component where you want to use[(ngModel)]in order to be able to work with it!
import { Component } from '@angular/core';
import { FormsModule } from '@angular/forms';

@Component({
  selector: 'app-root',
  standalone: true,
  imports: [FormsModule],
  templateUrl: './app.component.html',
  styleUrl: './app.component.css'
})
export class AppComponent {
  ...
}
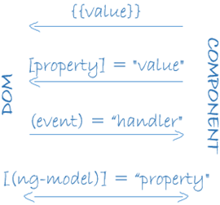
Summary
- This one picture says it all:
Check it yourself
- Check the news app and find out where we already implemented these
data bindings!
Exercise
Building on the stackblitz above implement the following features:
- Add a click event that when you click on the image, it opens the image_url in a new tab (using JS)
- Add a new
<p>element and an input checkbox, use data binding to make the<p>tag show appear or hide based on the status of the checkbox. (tip: use ngIf, ...)