Full Stack Security (Auth0)
Full Stack Security
Security is a very important aspect of web applications. We must ensure that both our Angular web application and communication with the API are secure. Proper implementation and configuration ensure that our web app is not vulnerable to the following OWASP top 10 Web Application Security Risks:
- A01:2021-Broken Access Control
- A07:2021-Identification and Authentication Failures
Source: OWASP Top 10
These days, it's not as common anymore to build a completely custom authentication module for your web applications. The reason for this? The smallest mistake in your implementation can result in a security risk. Fortunately, there are companies that specialize in these matters and offer them to us as a service. In this topic, we are going to use Auth0 for everything that has to do with authentication and authorization!
Goals
At the end of this topic we want to achieve the following goals:
- Have an account on Auth0
- Have our Angular App and API registered on Auth0
- Use the Auth0 signup/login/logout functionalities in our Angular App
- Configured our API, so it uses JWT and Auth0 for its authentication/authorization mechanism
- Implemented the Auth0 HTTP Interceptor in our Angular App
- Connected the Angular App and the API, so the API knows that an authenticated user in the Angular App can access the API resources
- Added route guards, which makes routes only accessible when authenticated
- Navigation bar items dynamically change based on whether you are logged in or not
- Create a route guard which checks for permissions
- Implement role-based security
Steps
1. Auth0 account
- Go to Auth0 and create an account
- Skip the tutorial as we'll add the application and API in the next step from scratch
2. Register the Angular App and API on Auth0
Angular App
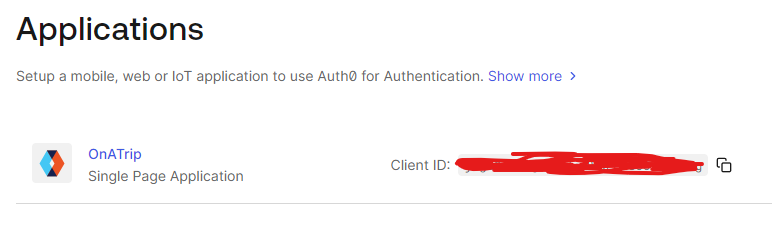
- Go in the left menu bar to the Applications section and choose to create a new application and follow the next steps:
- Enter a name and select Single Page Web Applications
- Skip the Quickstart and go straight to Settings
- Find the Application URIs section and enter the Callback URL, Logout URLs and Allowed Web Origins
- Callback URLs: URL where Auth0 will redirect you to after the user authenticates
- Logout URLs: URL where Auth0 will redirect you to after logout
- Allowed Web Origins: Which URLs are allowed to connect with this Auth0 app (CORS!)
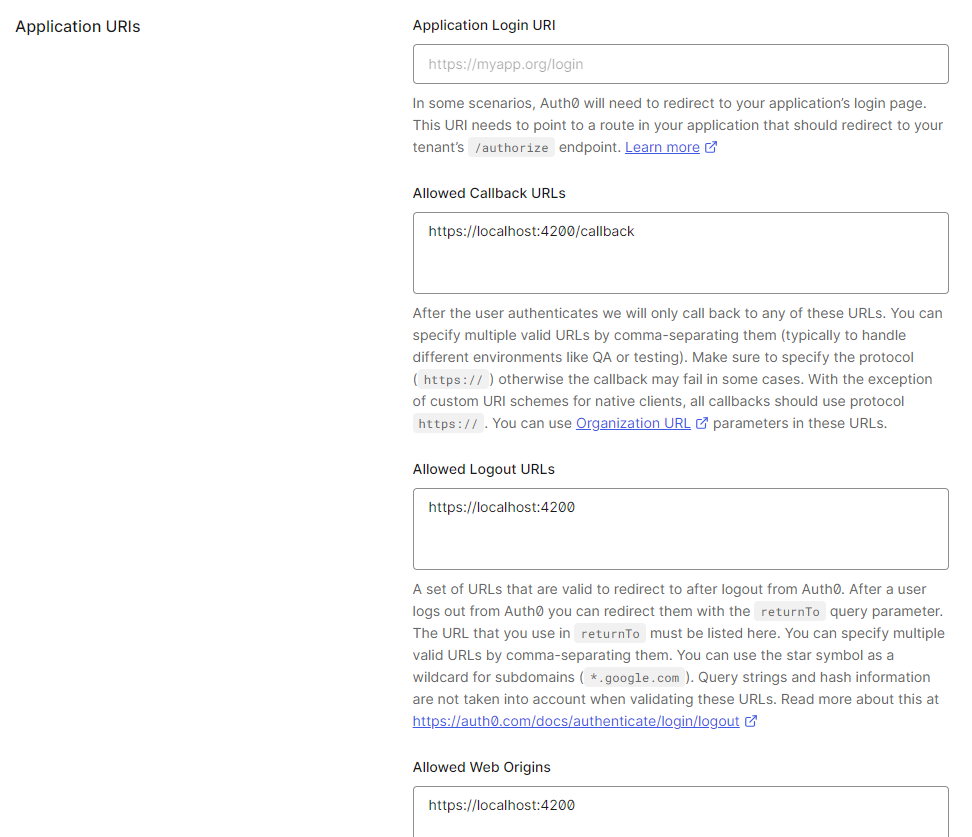
application uris
- In the Cross-Origin Authentication section make sure to Allow Cross-Origin Authentication!
- Don't forget to save your changes
API
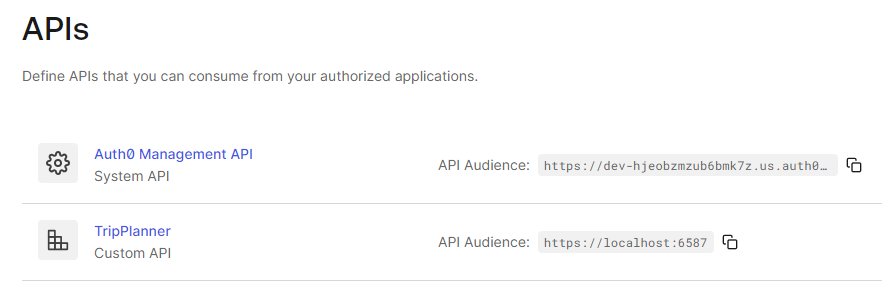
- Go in the left menu bar to the APIs section and choose to create a new API and follow the next steps:
- Enter a name
- Enter the identifier. This is the URL where your API will live. This can be a localhost URL, so we are able to 'connect' to our local API. Make sure to run the API and copy the HTTPS URL in the Identifier field
- This field cannot be modified, so you'll need a new API when deploying to production!

new api
- After creating the API, go to Settings and Enable all RBAC settings (Role-based access control). This will allow us to work with roles and permissions
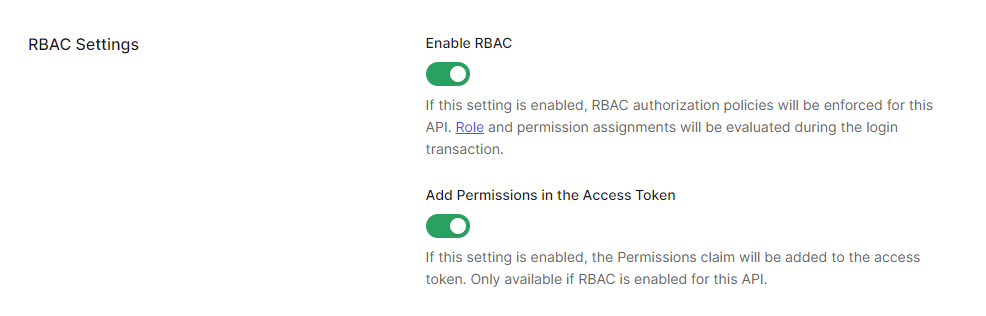
rbac
3. Configure Auth0 in the Angular App
In the following section we'll describe what's needed in your Angular App to make use of the Auth0 functionalities.
- First install the Auth0 Angular SDK from npm:
npm install @auth0/auth0-angular
Register and configure the AuthModule (Standalone applications)
import {
  ApplicationConfig,
  provideBrowserGlobalErrorListeners,
  provideZoneChangeDetection,
} from "@angular/core";
import { provideRouter } from "@angular/router";
import { appRoutes } from "./app.routes";
import { provideHttpClient, withInterceptors } from "@angular/common/http";
import { authHttpInterceptorFn, provideAuth0 } from "@auth0/auth0-angular";

export const appConfig: ApplicationConfig = {
  providers: [
    provideBrowserGlobalErrorListeners(),
    provideZoneChangeDetection({ eventCoalescing: true }),
    provideRouter(appRoutes),
    provideHttpClient(withInterceptors([authHttpInterceptorFn])),
    provideAuth0({
      domain: import.meta.env["NG_APP_DOMAIN"], //domain
      clientId: import.meta.env["NG_APP_CLIENTID"], //client id
      authorizationParams: {
        audience: import.meta.env["NG_APP_AUDIENCE"], // api url
        redirect_uri: import.meta.env["NG_APP_REDIRECT_URI"], // callback route e.g. http://localhost:4200/callback
      },
      httpInterceptor: {
        allowedList: [`${import.meta.env["NG_APP_LEGO_API_URL"]}/*`], // api url e.g. https://localhost:7002/api
      },
    }),
  ],
};
Environment variables
You need to set up your application to work with a .env file. The steps can be found in the Nx - Environment variables & .env files
- Don't forget to create an
env.d.tsfile in thesrcfolder of your application/library where you want to access the environment variables.
declare interface Env {
  readonly NODE_ENV: string;
  [key: string]: any;
}
declare interface ImportMeta {
  readonly env: Env;
}
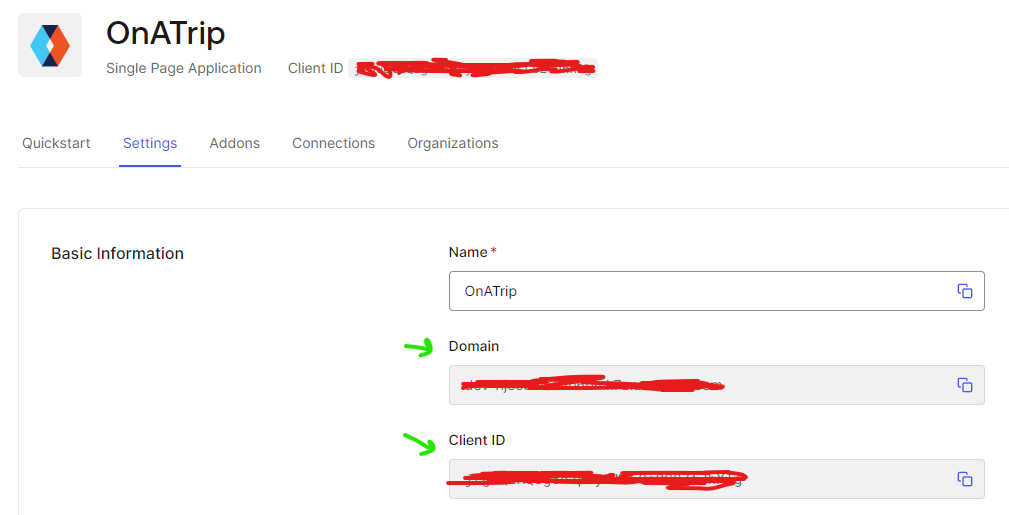
- The Domain and Client ID can be found in the settings of the Angular app on Auth0!
That's it! Your Angular app is ready for authentication!
4. Login, logout and username
Now that Auth0 is configured in our Angular app, we can focus on some Auth0 functionalities. In this topic we will implement a login and logout process through buttons in our menu item.
//menu-component.ts
import { NgClass } from "@angular/common";
import { Component, inject } from "@angular/core";
import { Router, RouterModule } from "@angular/router";
import { AuthService } from "@auth0/auth0-angular";
import { toSignal } from "@angular/core/rxjs-interop";

@Component({
  selector: "app-menu-component",
  imports: [NgClass, RouterModule],
  templateUrl: "./menu-component.html",
  styleUrl: "./menu-component.css",
})
export class MenuComponent {
  private router = inject(Router);
  private auth = inject(AuthService);

  hamburgerOpen = false;
  adminDropdownOpen = false;

  readonly isAuth = toSignal(this.auth.isAuthenticated$, {
    initialValue: false,
  });
  readonly user = toSignal(this.auth.user$, { initialValue: null });

  toggleHamburger(): void {
    this.hamburgerOpen = !this.hamburgerOpen;
  }

  onHamburgerItemClick() {
    this.hamburgerOpen = false;
  }

  onAdminDropDownClick() {
    this.adminDropdownOpen = !this.adminDropdownOpen;
  }

  closeAdminDropDown() {
    this.adminDropdownOpen = false;
  }

  navigateTo(path: string) {
    this.closeAdminDropDown();
    this.hamburgerOpen = false;
    this.router.navigate([path]);
  }

  login() {
    this.auth.loginWithRedirect({
      appState: {
        target: "/",
      },
      authorizationParams: {
        prompt: "login",
      },
    });
  }

  logout() {
    this.auth.logout({
      logoutParams: {
        returnTo: import.meta.env["NG_APP_HOME_URI"], // this is where we redirect to when the user is logged out
      },
    });
  }
}
<nav class="bg-white border-gray-200 px-2 sm:px-4 py-2.5">
  <div class="container flex flex-wrap justify-between items-center mx-auto">
    <a href="#" class="flex items-center">
      <span class="self-center text-xl font-semibold">My News</span>
    </a>
    <button
      (click)="toggleHamburger()"
      data-collapse-toggle="navbar-default"
      type="button"
      class="inline-flex items-center p-2 ml-3 text-sm text-gray-500 rounded-lg md:hidden hover:bg-gray-100 focus:outline-none focus:ring-2 focus:ring-gray-200"
      aria-controls="navbar-default"
      [attr.aria-expanded]="hamburgerOpen"
    >
      <span class="sr-only">Open main menu</span>
      <svg
        class="w-6 h-6"
        aria-hidden="true"
        fill="currentColor"
        viewBox="0 0 20 20"
        xmlns="http://www.w3.org/2000/svg"
      >
        <path
          fill-rule="evenodd"
          d="M3 5a1 1 0 011-1h12a1 1 0 110 2H4a1 1 0 01-1-1zM3 10a1 1 0 011-1h12a1 1 0 110 2H4a1 1 0 01-1-1zM3 15a1 1 0 011-1h12a1 1 0 110 2H4a1 1 0 01-1-1z"
          clip-rule="evenodd"
        ></path>
      </svg>
    </button>
    <div
      class="w-full md:w-auto md:block"
      id="navbar-default"
      [ngClass]="hamburgerOpen ? 'block' : 'hidden'"
    >
      <ul
        class="flex flex-col p-4 mt-4 bg-gray-50 rounded-lg border border-gray-100 md:flex-row md:space-x-8 md:mt-0 md:text-sm md:font-medium md:border-0 md:bg-white "
      >
        <li>
          <a
            (click)="onHamburgerItemClick()"
            routerLink="/"
            routerLinkActive="active"
            [routerLinkActiveOptions]="{ exact: true }"
            class="block py-2 pr-4 pl-3 rounded "
            >Home</a
          >
        </li>
        <li>
          <a
            (click)="onHamburgerItemClick()"
            routerLink="/article"
            routerLinkActive="active"
            [routerLinkActiveOptions]="{ exact: true }"
            class="block py-2 pr-4 pl-3 rounded"
            >Article</a
          >
        </li>
        <li>
          <button
            id="dropdownNavbarLink"
            (click)="onAdminDropDownClick()"
            class="flex justify-between items-center py-2 pr-4 pl-3 w-full"
          >
            Admin
            <svg
              class="ml-1 w-5 h-5"
              aria-hidden="true"
              fill="currentColor"
              viewBox="0 0 20 20"
              xmlns="http://www.w3.org/2000/svg"
            >
              <path
                fill-rule="evenodd"
                d="M5.293 7.293a1 1 0 011.414 0L10 10.586l3.293-3.293a1 1 0 111.414 1.414l-4 4a1 1 0 01-1.414 0l-4-4a1 1 0 010-1.414z"
                clip-rule="evenodd"
              ></path>
            </svg>
          </button>
          <!-- Dropdown menu -->
          @if(adminDropdownOpen) {
          <div
            id="dropdownNavbar"
            (mouseleave)="closeAdminDropDown()"
            class="z-10 w-44 font-normal shadow"
          >
            <ul
              class="py-1 text-sm text-gray-700 "
              aria-labelledby="dropdownLargeButton"
            >
              <li>
                <a
                  (click)="navigateTo('admin/category')"
                  class="block py-2 px-4 hover:bg-gray-100 dark:hover:bg-gray-600 dark:hover:text-white"
                  >Categories</a
                >
              </li>
            </ul>
          </div>
          }
        </li>
        @if (isAuth()) {
        <li>
          <button
            class="rounded-md bg-blue-600 px-4 py-2 text-sm font-medium text-white
                     hover:bg-blue-700 focus-visible:outline-none focus-visible:ring-2
                     focus-visible:ring-blue-500 focus-visible:ring-offset-2 transition cursor-pointer"
            (click)="logout()"
          >
            Log out
          </button>
        </li>
        <li>
          <span class="text-sm text-gray-600"
            >Hi, {{ user()?.nickname || user()?.name }}</span
          >
        </li>
        } @else {
        <li>
          <button
            class="rounded-md bg-blue-600 px-4 py-2 text-sm font-medium text-white
                     hover:bg-blue-700 focus-visible:outline-none focus-visible:ring-2
                     focus-visible:ring-blue-500 focus-visible:ring-offset-2 transition cursor-pointer"
            (click)="login()"
          >
            Log in
          </button>
        </li>
        }
      </ul>
    </div>
  </div>
</nav>
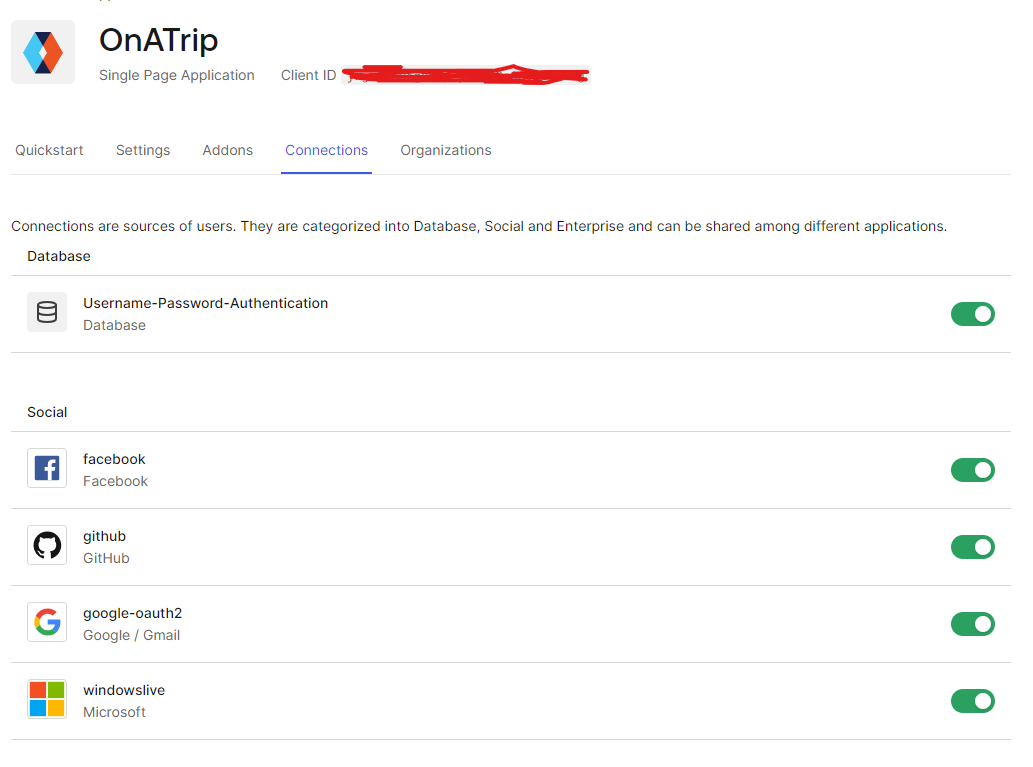
Configure connections
- For each app you can choose which connections can be used to login
Signup
The signup process is very similar to the login. As logging in and signing up are very similar for Auth0, we have to call the same loginWithRedirect function, but with the screen_hint option we let Auth0 know we are initiating the signup flow.
  handleSignUp(): void {
    this.auth.loginWithRedirect({
      appState: {
        target: "/",
      },
      authorizationParams: {
        prompt: "login",
        screen_hint: "signup",
      },
    });
  }
5. Configure our API
In this step I will focus on configuring an ASP.NET Core 9 Web API, but know that any API can be configured to use Auth0! I'll just go over the files that we need to modify to let our Web API use JWT as authentication/authorization mechanism and connect it to our API we configured on Auth0.
Note: an example Web API can be found on this Github repo.
Program.cs
In our Program.cs we have to enable authentication and authorization. The AddJwtBearer extension method enables JWT-bearer authentication using the default scheme AuthenticationScheme. JWT bearer authentication performs authentication by extracting and validating a JWT token from the Authorization request header. This is what we want, because in the end we want to secure most of our API calls and we want to know which user makes the call.
- Install the
Microsoft.AspNetCore.Authentication.JwtBearerNuGet package. - Add the
DOMAINandAUDIENCEto your.envfile (find the values on your Auth0 dashboard)
//Program.cs
// Get Auth0 information from .env
var domain = Environment.GetEnvironmentVariable("DOMAIN");
var audience = Environment.GetEnvironmentVariable("AUDIENCE");

builder.Services.AddAuthentication().AddJwtBearer(options =>
{
  options.Authority = $"https://{domain}/";
  options.Audience = audience;
});

builder.Services.AddAuthorization();

builder.Services.AddControllers();
...
We also want to configure CORS, so (only) our Angular app is allowed to communicate with the API. Make sure to add the local domain/port where the Angular app is running to the WithOrigins method.
//Program.cs

var app = builder.Build();

app.UseCors(options =>
{
  options.AllowAnyHeader();
  options.AllowAnyMethod();
  options.WithOrigins("http://localhost:4200", "https://localhost:4200");
});
...
Swagger
When creating a .NET Core Web API, Swagger is added as a tool to design, build, document and consume RESTful APIs. If we want to test our API through Swagger directly, we have to add a Bearer token to the secured API calls. Before this is possible, we have to extend the basic Swagger functionalities. How? By adding a SwaggerExtensions.cs class and use it when we configure Swagger on startup (Program.cs):
//SwaggerExtensions.cs

using Microsoft.OpenApi.Models;

public static class SwaggerExtensions
{
  public static IServiceCollection AddSwaggerService(this IServiceCollection services)
  {
    // Learn more about configuring Swagger/OpenAPI at https://aka.ms/aspnetcore/swashbuckle
    services.AddEndpointsApiExplorer();
    services.AddSwaggerGen(options =>
    {
      options.SwaggerDoc("v1", new OpenApiInfo
      {
        Title = "TripPlannerBackend.API",
        Description = "Learn how to protect your .NET applications with Auth0",
        Contact = new OpenApiContact
        {
          Name = ".NET Identity with Auth0",
          Url = new Uri("https://auth0.com/resources/ebooks/net-identity-with-auth0?utm_source=" +
          "auth0_dotnet_template&utm_medium=sc&utm_campaign=webapi_dotnet_ebook")
        },
        Version = "v1.0.0"
      });

      var securitySchema = new OpenApiSecurityScheme
      {
        Description = "Using the Authorization header with the Bearer scheme.",
        Name = "Authorization",
        In = ParameterLocation.Header,
        Type = SecuritySchemeType.Http,
        Scheme = "bearer",
        Reference = new OpenApiReference
        {
          Type = ReferenceType.SecurityScheme,
          Id = "Bearer"
        }
      };

      options.AddSecurityDefinition("Bearer", securitySchema);

      options.AddSecurityRequirement(new OpenApiSecurityRequirement
        {
            { securitySchema, new[] { "Bearer" } }
        });
    });

    return services;
  }
}
//Program.cs
builder.Services.AddControllers();

builder.Services.AddSwaggerService();

var app = builder.Build();
Running the API now gives us the possibility to add a Bearer token in the Swagger interface:

authorize button 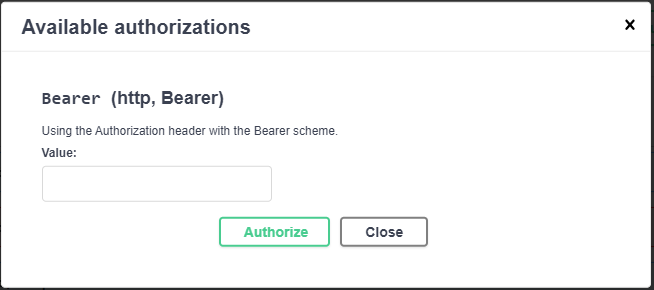
bearer token
Hmm, but where to get our token? Later, when we call the API from our Angular app (after being logged in) we can send the received token with the request. But for now? Easy! Let's go back to the Auth0 website and navigate to our API. Now click on Test and authorize the app for becoming testable.
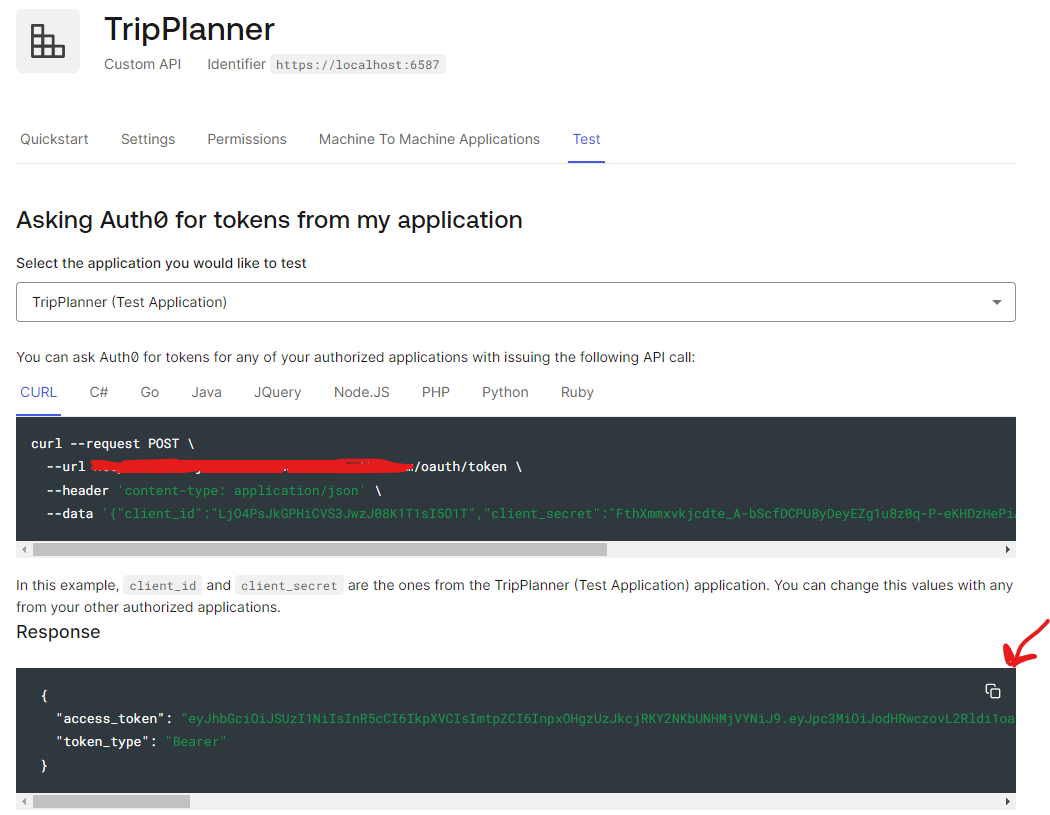
api token local Auth0 is now performing a successful login and provides you with the token as its response
Paste this token in the Swagger input field
Now every protected API endpoint can be called because of the token being added to the authorization header!
Securing endpoints in .NET Core Web APIs
- You can secure endpoints (action methods or entire controllers) using the
[Authorize]attribute - You can get the unique id of the authenticated user through accessing the claims of the User:
string userId = User.FindFirst(ClaimTypes.NameIdentifier).Value;- You can secure endpoints (action methods or entire controllers) using the
6. Make calls to protected API endpoints from the Angular App
In the previous step we generated a token on the Auth0 website, but as you know, when a user authenticates in our Angular App, a token is automatically generated for that user, containing specific information about that user (claims). As we already know how to log in, we now need to find a way to pass the token (preferably automatically) to our API calls.
In Angular, we can use HTTP Interceptors to intercept HttpRequests and transform them before they are sent. Let's take a quick look at how such an interceptor is built (we're not going to use this one!):
//auth.interceptor.ts

import { inject } from "@angular/core";
import { HttpInterceptorFn } from "@angular/common/http";
import { switchMap } from "rxjs";
import { AuthService } from "@auth0/auth0-angular";

export const authInterceptor: HttpInterceptorFn = (req, next) => {
  const authService: AuthService = inject(AuthService);

  return authService.getAccessTokenSilently().pipe(
    switchMap((token) => {
      const newRequest = req.clone({
        setHeaders: {
          Authorization: `Bearer ${token}`,
        },
      });

      return next(newRequest);
    })
  );
};
As you can see, the intercept method is called on each HttpRequest performed by Angular through the HttpClient. In this example, before the HttpRequest is sent, we:
- Call the
AuthServiceand get the access token - We clone the current request
- We add the
Authorizationheader to the cloned request - We return the cloned request, which will be performed!
This shows us the inner workings of an interceptor so we know what's going on under the hood when using the authHttpInterceptorFn from Auth0! Yes, because this is such a common authentication scenario, Auth0 already has an interceptor which automatically adds the Bearer token to the Authorization header of all requests! Let's see how we can use it!
//app.config.ts

import { ApplicationConfig } from "@angular/core";
import { provideHttpClient, withInterceptors } from "@angular/common/http";
import {
  provideRouter,
  withEnabledBlockingInitialNavigation,
} from "@angular/router";
import { appRoutes } from "./app.routes";
import { provideAuth0, authHttpInterceptorFn } from "@auth0/auth0-angular";
import { environment } from "environments";

const domain = environment.AUTH0_DOMAIN;
const clientId = environment.AUTH0_CLIENT_ID;

export const appConfig: ApplicationConfig = {
  providers: [
    provideBrowserGlobalErrorListeners(),
    provideZonelessChangeDetection(),
    provideHttpClient(withInterceptors([authHttpInterceptorFn])),
    provideRouter(appRoutes, withEnabledBlockingInitialNavigation()),
    provideAuth0({
      domain: domain,
      clientId: clientId,
      authorizationParams: {
        audience: environment.AUTH0_AUDIENCE,
        redirect_uri: environment.redirectUri,
      },
      httpInterceptor: {
        allowedList: [
          `${environment.api_url}/trip`,
          `${environment.api_url}/trip/*`,
        ], // CASE SENSITIVE!
      },
    }),
  ],
};
In a nutshell:
- We register the
authHttpInterceptorFnfrom Auth0 as a function that should be used by ourHttpClientinterceptors - We add the API endpoint URIs to the
allowedListof thehttpInterceptor. All HTTP requests to these endpoints will be intercepted! Be aware these endpoint URIs are CASE SENSITIVE!
Perfect! When there is an authenticated user, the token is added to the authorization header. If there is no token, or the token has expired, the API will return a 401 Unauthorized.
7. Secure routes with guards
In this part of our Full Stack Security module, we'll talk about protecting our Angular routes. Most routes in an Angular application may only be visited by authenticated users.
Guards are classes that can be applied to a route and can be configured to check if a user is authenticated or if a user has the required role/permissions before Angular navigates to that route. An example of such a guard:
// auth.guard.ts

import { inject } from "@angular/core";
import { CanActivateFn, Router } from "@angular/router";
import { AuthService } from "./auth.service";

export const authGuard: CanActivateFn = () => {
  const authService: AuthService = inject(AuthService);
  const router: Router = inject(Router);

  if (authService.isAuthenticated()) {
    // If the user is authenticated, allow access to the route
    return true;
  } else {
    // If the user is not authenticated, redirect to the login page
    return router.createUrlTree(["/login"]);
  }
};
We intercept the routing by hooking on the canActivate method. In this method we perform the checks to determine if the routing can continue or not. In this example we can visit the route if we are authenticated, otherwise we are redirected to the login page.
As with the interceptors, Auth0 also has a default Guard ready that only allows route visiting for authenticated users. To use this AuthGuard we have to register it on the route(s) we want to protect:
AuthGuard (Auth0)
- This default guard only validates if there is an authenticated user.
- Role-based route protection is discussed in the next topic
// a .ts file where routes are defined

import { AuthGuard } from '@auth0/auth0-angular';

export const routes: Route[] = [
  {
    path: '',
    component: HomeComponent,
  },
  {
    path: 'trips',
    component: TripOverviewComponent,
    canActivate: [AuthGuard]
  },
];
The two things we have to do:
- Import the
AuthGuardfrom Auth0 - Add the
AuthGuardto thecanActivatearray
Note
Note that this is the most basic way to implement route protection. We can have multiple guards with different logic, we cannot only disable the route but also the child routes if the guard blocks the visit, ...
8. Role-based security
Role-based security in Angular and Auth0 means granting or restricting access to specific features based on a user's assigned roles. Auth0 stores these roles and includes them in the user's ID/Access tokens.
In Angular, your app reads these roles and uses guards or conditional logic to decide which routes, components, or actions a user is allowed to access. This ensures users only see and do what their role permits.
The .NET backend then verifies these roles on every protected API request to ensure only authorized users can perform specific operations.
Client side
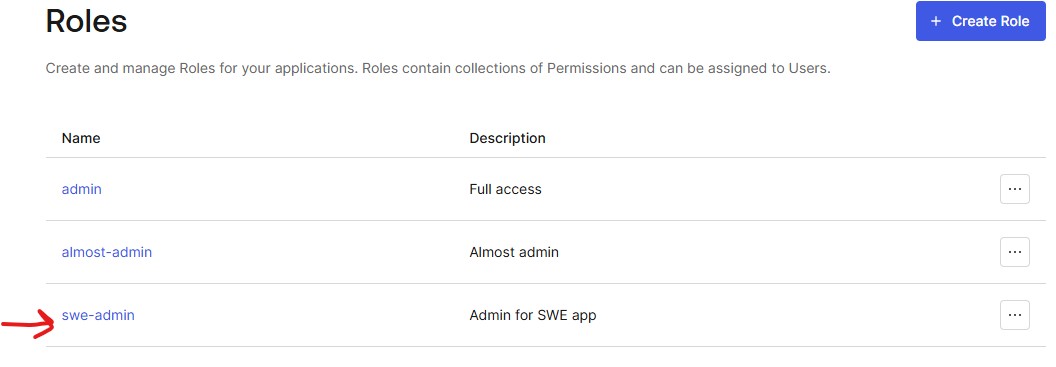
Create roles
- In Auth0 Dashboard, go to User Management - Roles
- Create a new role (it's a good idea to include your application name within the role, because all the Auth0 roles are not application specific)
Assign role to user
- Go to User Management - Users
- Assign one or more roles to a chosen user
Add roles to the ID Token / Access Token
- Create a
Login / Post Loginaction (Actions - Create Action - Custom Action)
exports.onExecutePostLogin = async (event, api) => {
  const namespace = "https://myapp.swedemo.com"; // Change this to a unique namespace for your application

  if (event.authorization && event.authorization.roles) {
    api.idToken.setCustomClaim(`${namespace}/roles`, event.authorization.roles);

    api.accessToken.setCustomClaim(
      `${namespace}/roles`,
      event.authorization.roles
    );
  }
};
- Go to Triggers - post-login and add the action to the flow
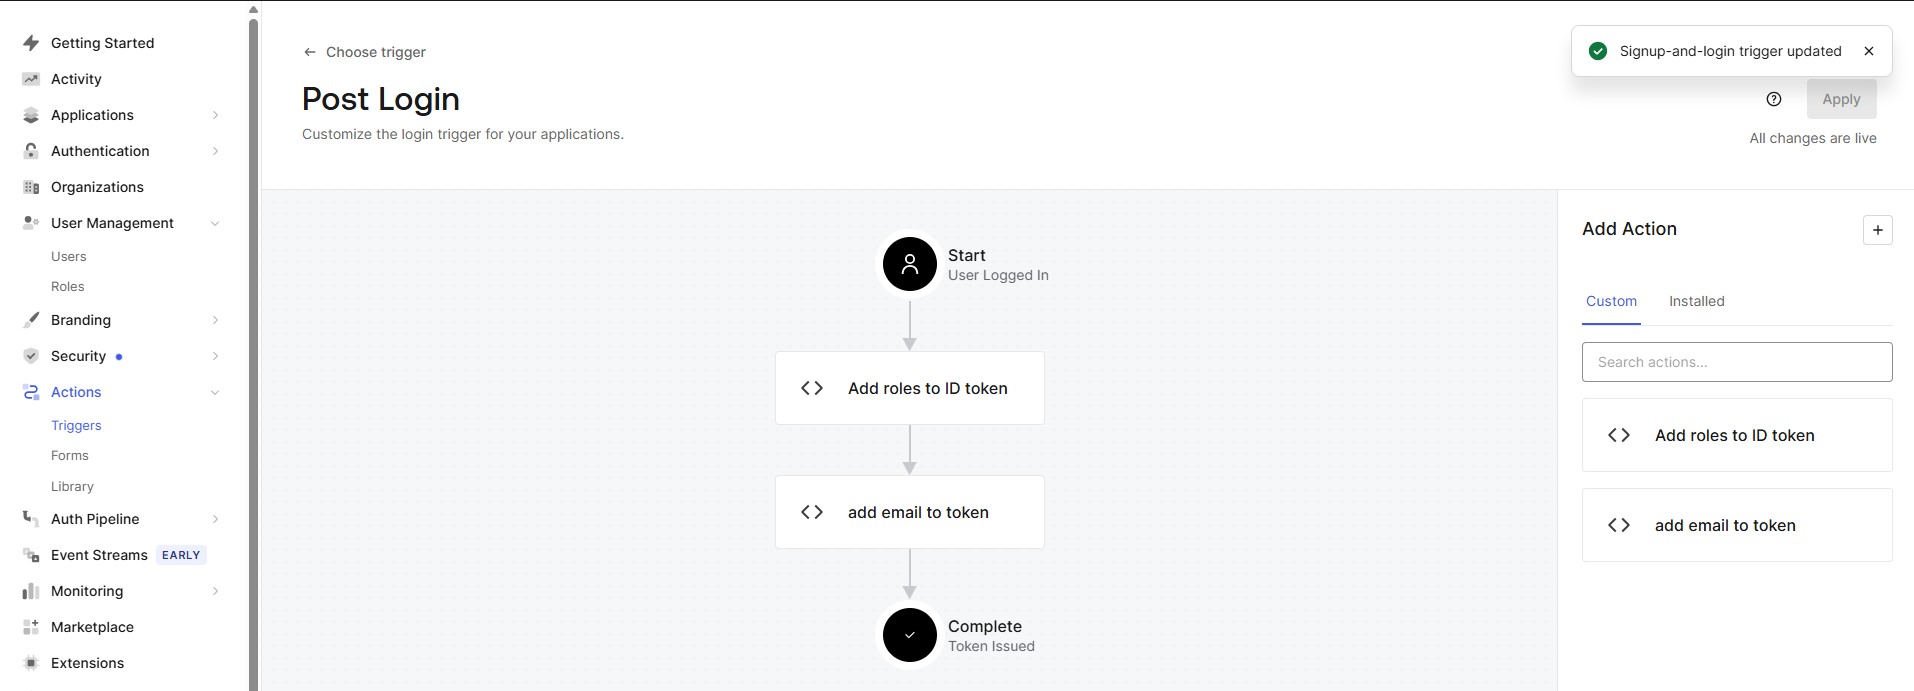
Action templates
There are templates available for actions. The Add Email to Access Token is such a template.
Role guard
- In the Angular application we can create a new
role guardto protect our routes based on roles - You are allowed to generate this guard in your
appdirectly by specifying the project name in the generate command.swe-demois our Angular application (not a library) nx g @nx/angular:guard --project=swe-demo- Choose
CanActivatefor the type of guard
import { inject } from "@angular/core";
import { CanActivateFn, Router } from "@angular/router";
import { AuthService } from "@auth0/auth0-angular";
import { tap, switchMap, of, map } from "rxjs";

export const roleGuard: CanActivateFn = (route, state) => {
  const auth = inject(AuthService);
  const router = inject(Router);

  const requiredRoles = route.data["roles"] as string[] | undefined;
  const rolesClaim = "https://myapp.swedemo.com/roles"; // <-- this is the namespace that you've chosen in your custom action in Auth0!

  // 1. First require authentication
  return auth.isAuthenticated$.pipe(
    tap((isAuth) => {
      if (!isAuth) {
        auth.loginWithRedirect({
          appState: { target: state.url },
        });
      }
    }),
    switchMap((isAuth) => {
      if (!isAuth) return of(false);

      // 2. If route does not specify roles: allow authenticated users
      if (!requiredRoles || requiredRoles.length === 0) {
        return of(true);
      }

      // 3. Check the user's roles from the ID token
      return auth.user$.pipe(
        map((user) => {
          const roles = (user?.[rolesClaim] as string[]) || [];

          const hasRole = requiredRoles.some((r) => roles.includes(r));

          if (!hasRole) {
            return router.createUrlTree(["/unauthorized"]);
          }

          return true;
        })
      );
    })
  );
};
- The guard can be used on any route like this:
import { Route } from '@angular/router';
import { Callback, LegoSetOverview } from '@swe-monorepo/swe-demo-feature'
import { roleGuard } from './role-guard';

export const appRoutes: Route[] = [
    { path: "", component: LegoSetOverview, canActivate: [roleGuard], data: { roles: ['swe-admin'] } },
    { path: "callback", component: Callback }
];
Server side
- Make sure to enable RBAC and Add Permissions in the Access Token in the settings page of your API on Auth0
- Make the following modification to the
Program.csfrom your API project:
builder
  .Services.AddAuthentication()
  .AddJwtBearer(options =>
  {
    options.Authority = $"https://{domain}/";
    options.Audience = audience;

    options.TokenValidationParameters = new TokenValidationParameters
    {
      RoleClaimType = "https://myapp.swedemo.com/roles", // This is your self chosen namespace!!
      NameClaimType = ClaimTypes.NameIdentifier
    };

  });

builder.Services.AddAuthorization(options =>
{
  options.AddPolicy("LegoAdminOnly", policy =>
  {
    policy.RequireRole("swe-admin");
  });
});
app.UseHttpsRedirection();

app.UseAuthentication();

app.UseAuthorization();

app.MapControllers();

app.Run();
- Now you can secure your endpoints by adding the policy name to the
Authorizeattribute:
[HttpGet]
[Authorize(Policy = "LegoAdminOnly")]
public async Task<ActionResult<List<LegoSetResponseDto>>> GetAllLegoSets(
  [FromServices] ILegoSetRepository repo,
  [FromServices] IMapper mapper,
  CancellationToken ct
)
{
  //string userId = User.FindFirst(ClaimTypes.NameIdentifier).Value;
  var entities = await repo.GetLegoSetsAsync(ct);
  return Ok(mapper.Map<List<LegoSetResponseDto>>(entities));
}