How to create a CRUD with template-driven forms
About 11 min
How to create a CRUD with template-driven forms
- A lot of fronted applications are just a collection of a lot of forms with business logic behind them
- When creating forms, always ask yourself the three following questions
- How can we keep track of the global form state?
- Which form parts are valid and/or invalid?
- How to display error messages properly so the user knows what to do to fix the wrong form values?
- The Angular framework provides us a couple of strategies for handling forms. The one we are going to discuss in this course is template-driven forms
Reactive forms
- Another strategy for handling forms are Reactive forms
- Reactive forms provide a model-driven approach to handling form inputs whose values change over time.
- Reactive forms are only needed for complex forms, as we can do most of the stuff with template-driven forms
- Check the differences on the official Angular documentation
Template-driven forms
- Template-driven forms are suitable for almost all forms
- Login forms, contact forms, any business form
- Bind form controls to data in your model
- Specify validation rules, display validation errors, conditionally enable or disable specific controls, ...
- Form validation is achieved by using the same attributes as those you use with HTML form validation (required, min, ...)
- Based on the
ngModeltwo way data binding
Category CRUD
- In our application we want to work with categories. Each article belongs to a category, a category can belong to multiple articles
- These categories will be managed within the admin section of the application
- We have to alter our db.json file by
- Adding an array for
categories - Adding the FK
categoryIdto each article
- Adding an array for
- We have to create a
Categorymodel and service - We have to create a list component and form component
- This form component has to import the
FormsModulefrom the@angular/formspackage! - We have to add an 'Admin' section within our navbar and create new routes to the list and form components
In-Memory Web API
- In the
in-memory-data.service.tsfile we add an array for thecategoriesand we give each article acategoryId. - We also add a method that will automatially be called when we
POSTa new record to generate the next id
import { Injectable } from "@angular/core";
import { InMemoryDbService } from "angular-in-memory-web-api";
import { Article } from "./article";
import { Category } from "./category";

@Injectable({ providedIn: "root" })
export class InMemoryDataService implements InMemoryDbService {
  createDb() {
    const categories: Category[] = [
      {
        id: 1,
        name: "sport",
      },
      {
        id: 2,
        name: "economy",
      },
      {
        id: 3,
        name: "politics",
      },
    ];
    const articles: Article[] = [
      {
        id: 1,
        title: "Title article",
        subtitle: "Subtitle article",
        imageUrl:
          "https://images.pexels.com/photos/1202723/pexels-photo-1202723.jpeg?auto=compress&cs=tinysrgb&dpr=2&h=100&w=134",
        imageCaption: "caption image",
        content:
          "Lorem ipsum dolor sit amet consectetur adipisicing elit. Tenetur voluptas sequi voluptatum pariatur! Quae cumque quidem dolor maxime enim debitis omnis nemo facilis sequi autem? Quae tenetur, repellat vero deleniti vitae dolores? Cum tempore, mollitia provident placeat fugit earum, sint, quae iusto optio ea officiis consectetur sit necessitatibus itaque explicabo?",
        author: "Michaël Cloots",
        publishDate: "28/11/2020",
        categoryId: 1,
      },
      {
        id: 2,
        title: "Title article 2",
        subtitle: "Subtitle article 2",
        imageUrl:
          "https://images.pexels.com/photos/3422964/pexels-photo-3422964.jpeg?auto=compress&cs=tinysrgb&dpr=2&h=100&w=134",
        imageCaption: "caption image",
        content:
          "2 Lorem ipsum dolor sit amet consectetur adipisicing elit. Tenetur voluptas sequi voluptatum pariatur! Quae cumque quidem dolor maxime enim debitis omnis nemo facilis sequi autem? Quae tenetur, repellat vero deleniti vitae dolores? Cum tempore, mollitia provident placeat fugit earum, sint, quae iusto optio ea officiis consectetur sit necessitatibus itaque explicabo?",
        author: "Florian Smeyers",
        publishDate: "30/11/2020",
        categoryId: 2,
      },
    ];
    return { articles, categories };
  }

  // Auto-increment ids for POSTs
  genId(collection: { id: number }[]): number {
    return collection.length > 0
      ? Math.max(...collection.map((a) => a.id)) + 1
      : 1;
  }
}
Category model and service
- Like the
Articlemodel we need to create a model (=interface) for our Categories - Create the
category.tsfile in thesrc/appfolder and add the following content:
export interface Category {
  id: number;
  name: string;
}
- Furthermore we have to add our FK property to the
Articlemodel:
export interface Article {
    id: number;
    title: string;
    subtitle: string;
    imageUrl: string;
    imageCaption: string;
    content: string;
    author: string;
    publishDate: string;
    categoryId: number;
}
- With our model ready, we can create our service (
category-service.tsin thesrc/appfolder) and write ourget,getById,post,putanddeletefunctions: ng g s category-service
import { HttpClient } from "@angular/common/http";
import { inject, Injectable } from "@angular/core";
import { Observable } from "rxjs";
import { Category } from "./category";

@Injectable({
  providedIn: "root",
})
export class CategoryService {
  private apiUrl = "api/categories";
  private httpClient = inject(HttpClient);

  getCategories(): Observable<Category[]> {
    return this.httpClient.get<Category[]>(this.apiUrl);
  }

  getCategoryById(id: number): Observable<Category> {
    return this.httpClient.get<Category>(`${this.apiUrl}/${id}`);
  }

  postCategory(category: Category): Observable<Category> {
    const { id, ...data } = category; // strip id, so in memory web api generates an id
    return this.httpClient.post<Category>(this.apiUrl, data);
  }

  putCategory(id: number, category: Category): Observable<Category> {
    return this.httpClient.put<Category>(`${this.apiUrl}/${id}`, category);
  }

  deleteCategory(id: number): Observable<Category> {
    return this.httpClient.delete<Category>(`${this.apiUrl}/${id}`);
  }
}
Category list and form component
- We start our CRUD with a list of all categories. Let's create a new
CategoryListComponentin thesrc/appfolder:
ng g c category-list-component
- Add the following code to the
category-list-component.ts:
import { Component, inject, OnInit, signal } from "@angular/core";
import { Observable } from "rxjs";
import { Category } from "../category";
import { CategoryService } from "../category-service";
import { Router } from "@angular/router";
import { AsyncPipe } from "@angular/common";

@Component({
  selector: "app-category-list-component",
  imports: [AsyncPipe],
  templateUrl: "./category-list-component.html",
  styleUrl: "./category-list-component.css",
})
export class CategoryListComponent implements OnInit {
  categories$!: Observable<Category[]>;
  errorMessage = signal<string>("");

  private categoryService = inject(CategoryService);
  private router = inject(Router);

  ngOnInit(): void {
    this.getCategories();
  }

  getCategories() {
    this.categories$ = this.categoryService.getCategories();
  }

  add() {
    //Navigate to form in add mode
    this.router.navigate(["admin/category/form"], { state: { mode: "add" } });
  }

  edit(id: number) {
    //Navigate to form in edit mode
    this.router.navigate(["admin/category/form"], {
      state: { id: id, mode: "edit" },
    });
  }

  delete(id: number) {
    this.categoryService.deleteCategory(id).subscribe({
      next: (v) => this.getCategories(),
      error: (e: HttpErrorResponse) => this.errorMessage.set(e.statusText),
    });
  }
}
| code | description |
|---|---|
errorMessage = signal<string>(""); | A signal variable to store the error message when an error occurs |
this.getCategories(); | When the component is initiated we create an observable that will call the API to get the categories through a subscription via the async pipe in the template |
add() { ... } | Method for navigating to the CategoryFormComponent in add-state |
this.router.navigate(['admin/category/form'], { state: { mode: 'add' } }) | The state object is uses to add parameters to your route. In this case we want the CategoryFormComponent to know that we want to add a category |
edit(id: number) { ... } | Method for navigating to the CategoryFormComponent in edit-state (we pass the id of the category as a parameter as well) |
delete(id: number) { ... } | Delete the category |
We are returning the categories as an observable!
- As we prefer to work with the
async pipein thetemplatewe have to work with observable properties:categories$= will give us a list of categories when we subscribe with theasync pipe:::
- For the
category-list-component.html:
<div class="container mx-auto mt-8">
@if(errorMessage()) {
<div
class="rounded p-4 mb-4 text-lg bg-red-200 text-red-800 border-2 border-red-300"
>
{{errorMessage()}}
</div>
}
<div class="mb-4">
<h1 class="text-3xl">Categories</h1>
<div class="flex justify-end">
<button
class="px-4 py-2 rounded-md bg-sky-500 text-sky-100 hover:bg-sky-600"
(click)="add()"
>
Create category
</button>
</div>
</div>
<div class="overflow-x-auto sm:-mx-6 sm:px-6 lg:-mx-8 lg:px-8">
<div
class="inline-block min-w-full overflow-hidden align-middle border-b border-gray-200 shadow sm:rounded-lg"
>
<table class="min-w-full">
<thead>
<tr>
<th
class="px-6 py-3 text-xs font-medium text-left text-gray-500 border-b border-gray-200 bg-gray-50"
>
#
</th>
<th
class="px-6 py-3 text-xs font-medium text-left text-gray-500 border-b border-gray-200 bg-gray-50"
>
Name
</th>
<th
class="px-6 py-3 text-xs text-center text-gray-500 border-b border-gray-200 bg-gray-50"
>
</th>
</tr>
</thead>
<tbody class="bg-white">
@for (cat of categories$ | async; track cat.id) {
<tr>
<td class="px-6 py-4 border-b border-gray-200">
<div class="flex items-center">{{cat.id}}</div>
</td>
<td class="px-6 py-4 border-b border-gray-200">
<div class="text-sm text-gray-900">{{cat.name}}</div>
</td>
<td class="text-sm font-medium border-b border-gray-200">
<div class="flex justify-end gap-4">
<a
(click)="edit(cat.id)"
class="text-indigo-600 hover:text-indigo-900 cursor-pointer"
>
<svg
xmlns="http://www.w3.org/2000/svg"
class="w-6 h-6"
fill="none"
viewBox="0 0 24 24"
stroke="currentColor"
>
<path
stroke-linecap="round"
stroke-linejoin="round"
stroke-width="2"
d="M11 5H6a2 2 0 00-2 2v11a2 2 0 002 2h11a2 2 0 002-2v-5m-1.414-9.414a2 2 0 112.828 2.828L11.828 15H9v-2.828l8.586-8.586z"
/>
</svg>
</a>
<a (click)="delete(cat.id)" class="mr-0 md:mr-4 cursor-pointer"
><svg
xmlns="http://www.w3.org/2000/svg"
class="w-6 h-6 text-red-600 hover:text-red-800"
fill="none"
viewBox="0 0 24 24"
stroke="currentColor"
>
<path
stroke-linecap="round"
stroke-linejoin="round"
stroke-width="2"
d="M19 7l-.867 12.142A2 2 0 0116.138 21H7.862a2 2 0 01-1.995-1.858L5 7m5 4v6m4-6v6m1-10V4a1 1 0 00-1-1h-4a1 1 0 00-1 1v3M4 7h16"
/></svg
></a>
</div>
</td>
</tr>
}
</tbody>
</table>
</div>
</div>
</div>
- Let's move on and create our
CategoryFormComponentin thesrc/appfolder:
ng g c category-form-component
- Add the following code to the
category-form-component.ts:
import { Component, signal } from "@angular/core";
import { FormsModule } from "@angular/forms";
import { Category } from "../category";
import { Router } from "@angular/router";
import { CategoryService } from "../category-service";

@Component({
  selector: "app-category-form-component",
  imports: [FormsModule],
  templateUrl: "./category-form-component.html",
  styleUrl: "./category-form-component.css",
})
export class CategoryFormComponent {
  isAdd: boolean = false;
  isEdit: boolean = false;
  categoryId: number = 0;

  category = signal<Category>({ id: 0, name: "" });

  isSubmitted: boolean = false;
  errorMessage = signal<string>("");

  constructor(
    private router: Router,
    private categoryService: CategoryService
  ) {
    const state = this.router.currentNavigation()?.extras.state || {};
    this.isAdd = state["mode"] === "add";
    this.isEdit = state["mode"] === "edit";
    this.categoryId = +state["id"];

    if (!this.isAdd && !this.isEdit) {
      this.isAdd = true;
    }

    if (this.categoryId != null && this.categoryId > 0) {
      this.categoryService
        .getCategoryById(this.categoryId)
        .subscribe((result) => {
          this.category.set(result);
        });
    }
  }

  onSubmit() {
    this.isSubmitted = true;
    if (this.isAdd) {
      this.categoryService.postCategory(this.category()).subscribe({
        next: (v) => this.router.navigateByUrl("/admin/category"),
        error: (e: HttpErrorResponse) => this.errorMessage.set(e.statusText),
      });
    }
    if (this.isEdit) {
      this.categoryService
        .putCategory(this.categoryId, this.category())
        .subscribe({
          next: (v) => this.router.navigateByUrl("/admin/category"),
          error: (e: HttpErrorResponse) => this.errorMessage.set(e.statusText),
        });
    }
  }
}
| code | description |
|---|---|
imports: [FormsModule] | We have to import the FormsModule in order to work with a template-driven form. |
category = signal<Category>({ id: 0, name: "" }); | We need a category signal because the form will bind to its properties (empty or existing category) and it should be notified when we retrieved the category from the API |
line 27-30 | We read the route parameters and assign their values to local variables |
line 36-41 | If an id is passed as a route parameter we get the corresponding category from the API and assign it to our category object |
onSubmit() { ... } | Code that is executed when the form is submitted. Based on the isAdd/isEdit variables we decide if we have to add or edit a category |
this.category.set(result); | When the category is retrieved we set its value to the signal. This will trigger change detection in our template |
- The most important part, our form template(
category-form-component.html):
@if(isSubmitted && errorMessage()) {
<div
  class="rounded p-4 mb-4 text-lg bg-red-200 text-red-800 border-2 border-red-300"
>
  {{errorMessage()}}
</div>
}
<form (ngSubmit)="onSubmit()" #categoryForm="ngForm">
  <div class="mb-6">
    <label for="name" class="block mb-2 text-sm font-medium text-gray-900 "
      >Name</label
    >
    <input
      type="name"
      id="name"
      name="name"
      class="bg-gray-50 border border-gray-300 text-gray-900 text-sm rounded-lg focus:ring-blue-500 focus:border-blue-500 block w-full p-2.5"
      placeholder="Name"
      required
      [(ngModel)]="category().name"
      #name="ngModel"
    />
    <div [hidden]="name.valid || name.pristine" class="text-red-500 mt-2">
      Name is required
    </div>
  </div>

  @if(isAdd) {
  <button
    type="submit"
    [disabled]="!categoryForm.form.valid || isSubmitted"
    class="text-white bg-blue-700 enabled:hover:bg-blue-800 focus:ring-4 focus:outline-none focus:ring-blue-300 font-medium rounded-lg text-sm w-full sm:w-auto px-5 py-2.5 text-center disabled:opacity-75"
  >
    Add
  </button>
  } @if(isEdit) {
  <button
    type="submit"
    [disabled]="!categoryForm.form.valid || isSubmitted"
    class="text-white bg-blue-700 enabled:hover:bg-blue-800 focus:ring-4 focus:outline-none focus:ring-blue-300 font-medium rounded-lg text-sm w-full sm:w-auto px-5 py-2.5 text-center disabled:opacity-75"
  >
    Save
  </button>
  }
</form>
| code | description |
|---|---|
@if(isSubmitted && errorMessage()) | If the form is submitted (isSubmitted property = true) and an error message is set (errorMessage() signal) we show the message through Interpolation |
(ngSubmit)="onSubmit()" | When the user submits the form the onSubmit method in the component will be executed |
#categoryForm="ngForm" | We create a template variable categoryForm within the template. The value of this variable is the whole form (ngForm). This variable can be used in expression throughout the whole template. Read here more information on template variables |
[(ngModel)]="category().name" | The value of the text input is bound to the value of the signal property name on the category property. This is two-way data binding, so the component will always know the entered value and vice versa |
#name="ngModel" | Another template variable. We use this variable to check if the entered value is valid or not so we can show an appropriate message |
[hidden]="name.valid" and "name.pristine" | Don't show the error message if the name (=template variable) is valid or if the input is in its original condition (=pristine) |
- We'll also make use of CSS classes that Angular automatically assigns to form elements when they are valid or not (more information here)
- This gives us the opportunity to easily add custom styling for (in)valid elements
- Go the
category-form-component.scssand add the following code:
.ng-valid[required],
.ng-valid.required {
  border-left: 5px solid #42a948; /* green */
}

.ng-dirty:not(form).ng-invalid:not(form) {
  border-left: 5px solid #a94442; /* red */
}
- All required elements with the
ng-validclass will get a green left border - All elements with the
ng-invalidclass (and which are not forms and not pristine) will get a red left border
New navigation route
- Now that we've created the
CategoryListComponentandCategoryFormComponentwe need to create routes so we can navigate to these components. - Go to the
app-routing.module.tsand add the following 2 routes to theroutesarray:
const routes: Routes = [
  { path: '', component: HomeComponent },
  { path: 'article', component: ArticleComponent },
  { path: 'article/:id', component: ArticleDetailComponent },
  { path: 'admin/category', component: CategoryListComponent },
  { path: 'admin/category/form', component: CategoryFormComponent }
];
- These 2 (and all the other)
pathscan be used as the value for therouterLinkattribute of anaelement.
Admin section in navbar
- Time to add an 'Admin' dropdown in our navigation menu
- Go to the
menu-component.htmland add the dropdown:
<nav class="bg-white border-gray-200 px-2 sm:px-4 py-2.5">
    <div class="container flex flex-wrap justify-between items-center mx-auto">
        <a href="#" class="flex items-center">
            <span class="self-center text-xl font-semibold">My News</span>
        </a>
        <button (click)="toggleHamburger()" data-collapse-toggle="navbar-default" type="button"
            class="inline-flex items-center p-2 ml-3 text-sm text-gray-500 rounded-lg md:hidden hover:bg-gray-100 focus:outline-none focus:ring-2 focus:ring-gray-200"
            aria-controls="navbar-default" [attr.aria-expanded]="hamburgerOpen">
            <span class="sr-only">Open main menu</span>
            <svg class="w-6 h-6" aria-hidden="true" fill="currentColor" viewBox="0 0 20 20"
                xmlns="http://www.w3.org/2000/svg">
                <path fill-rule="evenodd"
                    d="M3 5a1 1 0 011-1h12a1 1 0 110 2H4a1 1 0 01-1-1zM3 10a1 1 0 011-1h12a1 1 0 110 2H4a1 1 0 01-1-1zM3 15a1 1 0 011-1h12a1 1 0 110 2H4a1 1 0 01-1-1z"
                    clip-rule="evenodd"></path>
            </svg>
        </button>
        <div class="w-full md:w-auto md:block" id="navbar-default" [ngClass]="hamburgerOpen ? 'block' : 'hidden'">
            <ul
                class="flex flex-col p-4 mt-4 bg-gray-50 rounded-lg border border-gray-100 md:flex-row md:space-x-8 md:mt-0 md:text-sm md:font-medium md:border-0 md:bg-white ">
                <li>
                    <a (click)="onHamburgerItemClick()" routerLink="/" routerLinkActive="active"
                        [routerLinkActiveOptions]="{ exact: true }" class="block py-2 pr-4 pl-3 rounded ">Home</a>
                </li>
                <li>
                    <a (click)="onHamburgerItemClick()" routerLink="/article" routerLinkActive="active"
                        [routerLinkActiveOptions]="{ exact: true }" class="block py-2 pr-4 pl-3 rounded">Article</a>
                </li>
                <li>
                    <button id="dropdownNavbarLink" (click)="onAdminDropDownClick()"
                        class="flex justify-between items-center py-2 pr-4 pl-3 w-full">Admin <svg class="ml-1 w-5 h-5"
                            aria-hidden="true" fill="currentColor" viewBox="0 0 20 20"
                            xmlns="http://www.w3.org/2000/svg">
                            <path fill-rule="evenodd"
                                d="M5.293 7.293a1 1 0 011.414 0L10 10.586l3.293-3.293a1 1 0 111.414 1.414l-4 4a1 1 0 01-1.414 0l-4-4a1 1 0 010-1.414z"
                                clip-rule="evenodd"></path>
                        </svg></button>
                    <!-- Dropdown menu -->
                    @if(adminDropdownOpen) {
                    <div id="dropdownNavbar" (mouseleave)="closeAdminDropDown()" class="z-10 w-44 font-normal shadow">
                        <ul class="py-1 text-sm text-gray-700 " aria-labelledby="dropdownLargeButton">
                            <li>
                                <a (click)="navigateTo('admin/category')"
                                    class="block py-2 px-4 hover:bg-gray-100 dark:hover:bg-gray-600 dark:hover:text-white">Categories</a>
                            </li>
                        </ul>
                    </div>
                    }
                </li>
            </ul>
        </div>
    </div>
</nav>
- We've added some functionality to show and hide the dropdown at the apropriate time:
menu-component.ts
import { NgClass } from "@angular/common";
import { Component, inject } from "@angular/core";
import { Router, RouterModule } from "@angular/router";

@Component({
  selector: "app-menu-component",
  imports: [NgClass, RouterModule],
  templateUrl: "./menu-component.html",
  styleUrl: "./menu-component.css",
})
export class MenuComponent {
  private router = inject(Router);

  hamburgerOpen = false;
  adminDropdownOpen = false;

  toggleHamburger(): void {
    this.hamburgerOpen = !this.hamburgerOpen;
  }

  onHamburgerItemClick() {
    this.hamburgerOpen = false;
  }

  onAdminDropDownClick() {
    this.adminDropdownOpen = !this.adminDropdownOpen;
  }

  closeAdminDropDown() {
    this.adminDropdownOpen = false;
  }

  navigateTo(path: string) {
    this.closeAdminDropDown();
    this.hamburgerOpen = false;
    this.router.navigate([path]);
  }
}
Navigation to form
- We already wrote code to navigate to the form when we choose to add or edit a category
- This shows us how we can navigate to components through code
category-list-component.ts:
  constructor(private categoryService: CategoryService, private router: Router) {
  }

  ...

  add() {
    //Navigate to form in add mode
    this.router.navigate(['admin/category/form'], {state: {mode: 'add'}});
  }

  edit(id: number) {
    //Navigate to form in edit mode
    this.router.navigate(['admin/category/form'], {state: {id: id, mode: 'edit'}});
  }
| code | description |
|---|---|
private router: Router | Via Depency Injection we get the router object which is used to navigate to routes, to get route information, ... |
this.router.navigate(...) | The navigate method allows us to navigate to a route by using the path (and to optionally add route parameters through the state object) |
The result
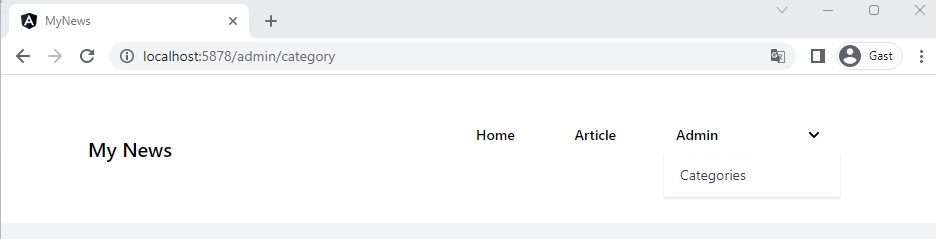
Dropdown menu in navigation:
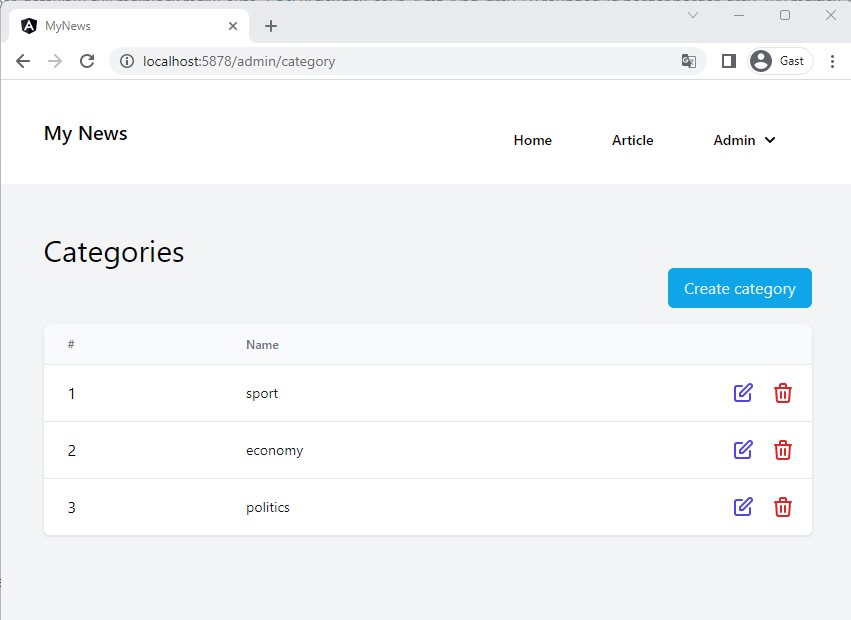
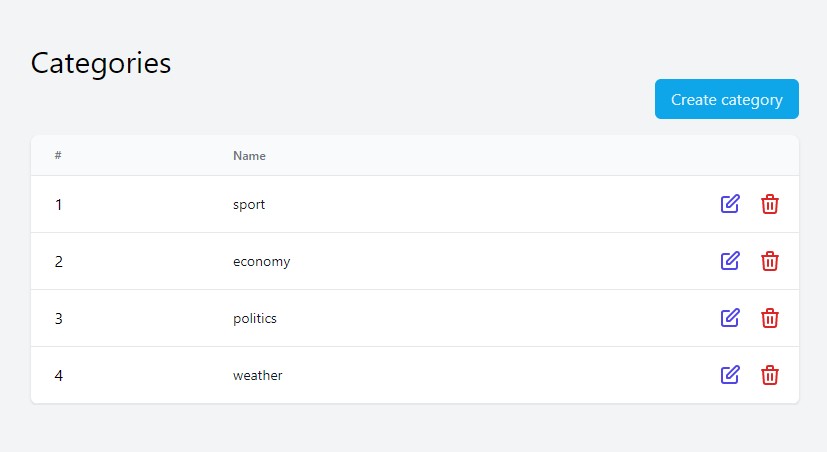
List of categories:
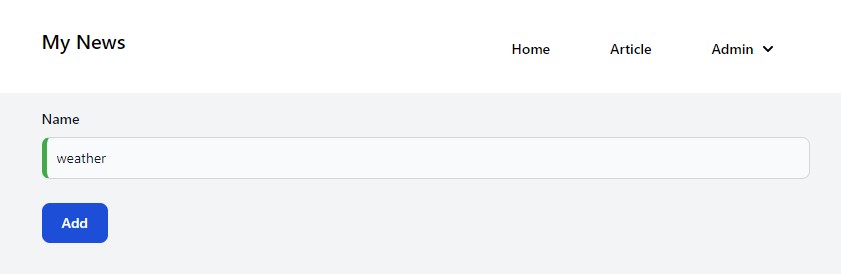
Add new category:
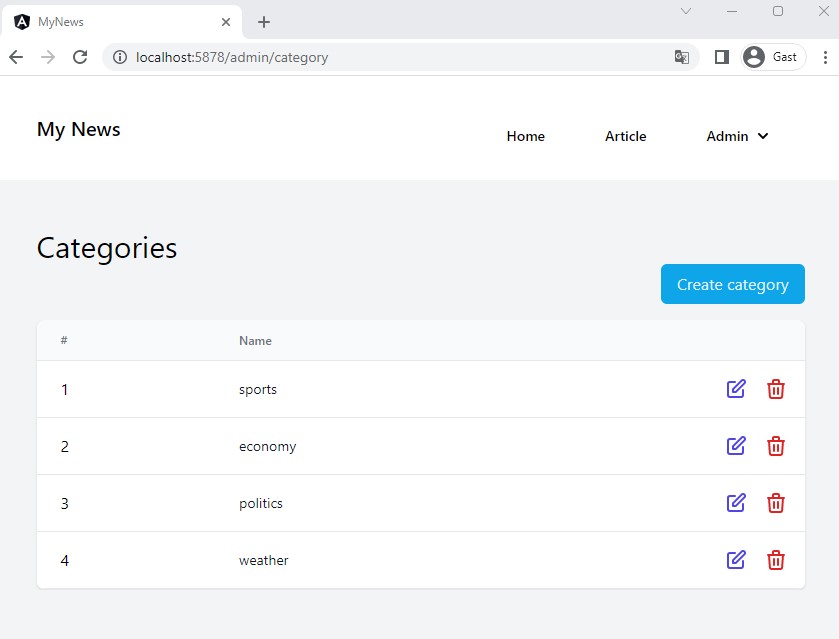
Updated list of categories:
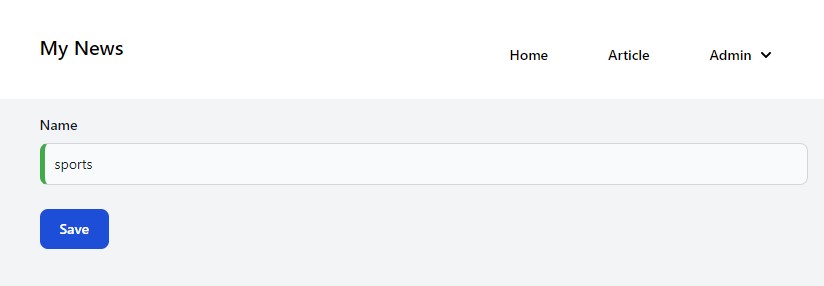
Edit the 'sport' category:
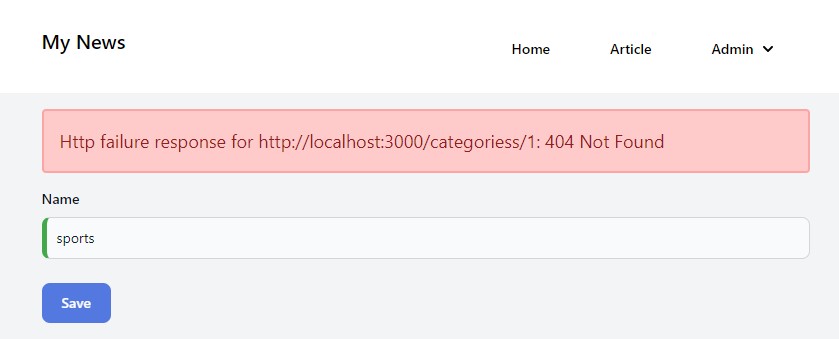
If we change the url to a wrong one: http://localhost:3000/categoriess/ we get an error, which is shown at the top of the page:
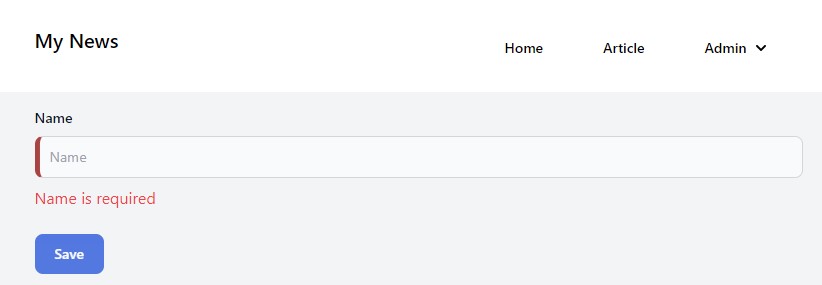
If the input is not valid (in this case empty), we see the red left border and the error message beneath the element
Updated list of categories (after fixing the url and saving 'sports'):